Debian/Ubuntu 下 MySQL 安装与优化全攻略
教程简介
本教程将带你从零开始在基于 Debian/Ubuntu 的 Linux 系统上安装并初步配置 MySQL 服务。你将学习如何:
更新系统软件包并安装
mysql-server;检查 MySQL 服务状态,确保其正常运行;
设置 MySQL 开机自启;
运行安全加固脚本(
mysql_secure_installation),提升数据库安全性;针对低内存环境(如个人博客或小型服务器)进行内存优化,显著降低资源占用。
完成本教程后,你的 MySQL 服务将处于安全、稳定且高效的状态,为后续应用(如 Halo、WordPress 等)提供可靠的数据支持。所有操作均基于命令行,适合运维新手和开发者快速上手
安装 MySQL 服务
更新软件包列表
sudo apt update安装 MySQL 服务器
sudo apt install mysql-server -y检查 MySQL 服务状态
sudo systemctl status mysql安装完成后, MySQL 服务通常会自动启动,查看 MySQL 服务状态通常为 active (running) ,表示 MySQL 正常运行,及以下输出结果:
● mysql.service - MySQL Community Server
     Loaded: loaded (/usr/lib/systemd/system/m
ysql.service; enabled; preset: enabled)
     Active: active (running) since Mon 2026-02-02 10:31:29 UTC; 49s ago # <== 运行状态:active (running)
    Process: 2289 ExecStartPre=/usr/share/mysql/mysql-systemd-start pre (code=exited, status=0/SUCCESS)
   Main PID: 2309 (mysqld)
     Status: "Server is operational"
      Tasks: 38 (limit: 9380)
     Memory: 363.9M (peak: 379.3M)
        CPU: 736ms
     CGroup: /system.slice/mysql.service
             └─2309 /usr/sbin/mysqld
如果 MySQL 没有运行,服务状态会为 inactive (dead) ,及如下输出结果:
○ mysql.service - MySQL Community Server
     Loaded: loaded (/usr/lib/systemd/system/mysql.service; enabled; preset: enabled)
     Active: inactive (dead) since Mon 2026-02-02 10:39:55 UTC; 6s ago # <== 运行状态:inactive (dead)
   Duration: 8min 25.626s
    Process: 2289 ExecStartPre=/usr/share/mysql/mysql-systemd-start pre (code=exited, status=0/SUCCESS)
    Process: 2309 ExecStart=/usr/sbin/mysqld (code=exited, status=0/SUCCESS)
   Main PID: 2309 (code=exited, status=0/SUCCESS)
     Status: "Server shutdown complete"
        CPU: 3.973s
如果 MySQL 没有运行,则需要启动 MySQL 服务,并检测其是否成功运行:
sudo systemctl start mysql && sudo systemctl status mysql理想情况下 MySQL 服务状态通常为 active (running) ,会出现以下输出结果:
● mysql.service - MySQL Community Server
     Loaded: loaded (/usr/lib/systemd/system/m
ysql.service; enabled; preset: enabled)
     Active: active (running) since Mon 2026-02-02 10:45:23 UTC; 1min 8s ago # <== 运行状态:active (running)
    Process: 2497 ExecStartPre=/usr/share/mysql/mysql-systemd-start pre (code=exited, status=0/SUCCESS)
   Main PID: 2505 (mysqld)
     Status: "Server is operational"
      Tasks: 37 (limit: 9380)
     Memory: 364.0M (peak: 378.8M)
        CPU: 1.583s
     CGroup: /system.slice/mysql.service
             └─2505 /usr/sbin/mysqld
配置 MySQL 服务
设置 MySQL 服务“开机自启动”(可选)
sudo systemctl enable mysql如果设置成功,会出现以下输出:
Synchronizing state of mysql.service with SysV service script with /usr/lib/systemd/systemd-sysv-install.
Executing: /usr/lib/systemd/systemd-sysv-install enable mysql
进一步确定,使用以下命令:
sudo systemctl is-enabled mysql如果返回值为 enabled 表示设置 MySQL 的“开机自启动”成功
运行安全安装脚本(推荐)
如果你的服务器需要用于生产环境,还需要进行这步设置,该步骤会进行以下自动化设置:
设置密码验证策略(建议 Y ,且设置 MEDIUM 以上的验证等级)
移除匿名用户(建议 Y )
禁止root远程登录(建议 Y )
移除测试数据库(建议 Y )
重新应用并加载权限表
如果需要更安全的 MySQL 数据库服务,需要这些这条命令:
sudo mysql_secure_installation设置密码验证策略
Securing the MySQL server deployment.

Connecting to MySQL using a blank password.

VALIDATE PASSWORD COMPONENT can be used to test passwords
and improve security. It checks the strength of password
and allows the users to set only those passwords which are
secure enough. Would you like to setup VALIDATE PASSWORD component?

Press y|Y for Yes, any other key for No: y # <== 启用密码验证策略组件

There are three levels of password validation policy:

LOW    Length >= 8
MEDIUM Length >= 8, numeric, mixed case, and special characters
STRONG Length >= 8, numeric, mixed case, special characters and dictionary file

Please enter 0 = LOW, 1 = MEDIUM and 2 = STRONG: 1 # <== 设置验证等级
移除匿名用户(建议Y)
By default, a MySQL installation has an anonymous user,
allowing anyone to log into MySQL without having to have
a user account created for them. This is intended only for
testing, and to make the installation go a bit smoother.
You should remove them before moving into a production
environment.

Remove anonymous users? (Press y|Y for Yes, any other key for No) : y # <== 移除匿名用户
禁止root远程登录(建议Y)
Normally, root should only be allowed to connect from
'localhost'. This ensures that someone cannot guess at
the root password from the network.

Disallow root login remotely? (Press y|Y for Yes, any other key for No) : y # <== 禁止root远程登录
移除测试数据库(建议Y)
By default, MySQL comes with a database named 'test' that
anyone can access. This is also intended only for testing,
and should be removed before moving into a production
environment.

Remove test database and access to it? (Press y|Y for Yes, any other key for No) : y # <== 移除测试数据库
重新应用并加载权限表
Reloading the privilege tables will ensure that all changes
made so far will take effect immediately.

Reload privilege tables now? (Press y|Y for Yes, any other key for No) : y # <== 重新应用并加载权限表
经过以上设置,该服务器上的 MySQl ,无法直接通过 DBeaver 等数据库工具直接连接,需要通过 SSH 隧道进行连接
性能优化(小型服务器推荐)
⚠️该性能优化仅针对于个人博客和小型服务器
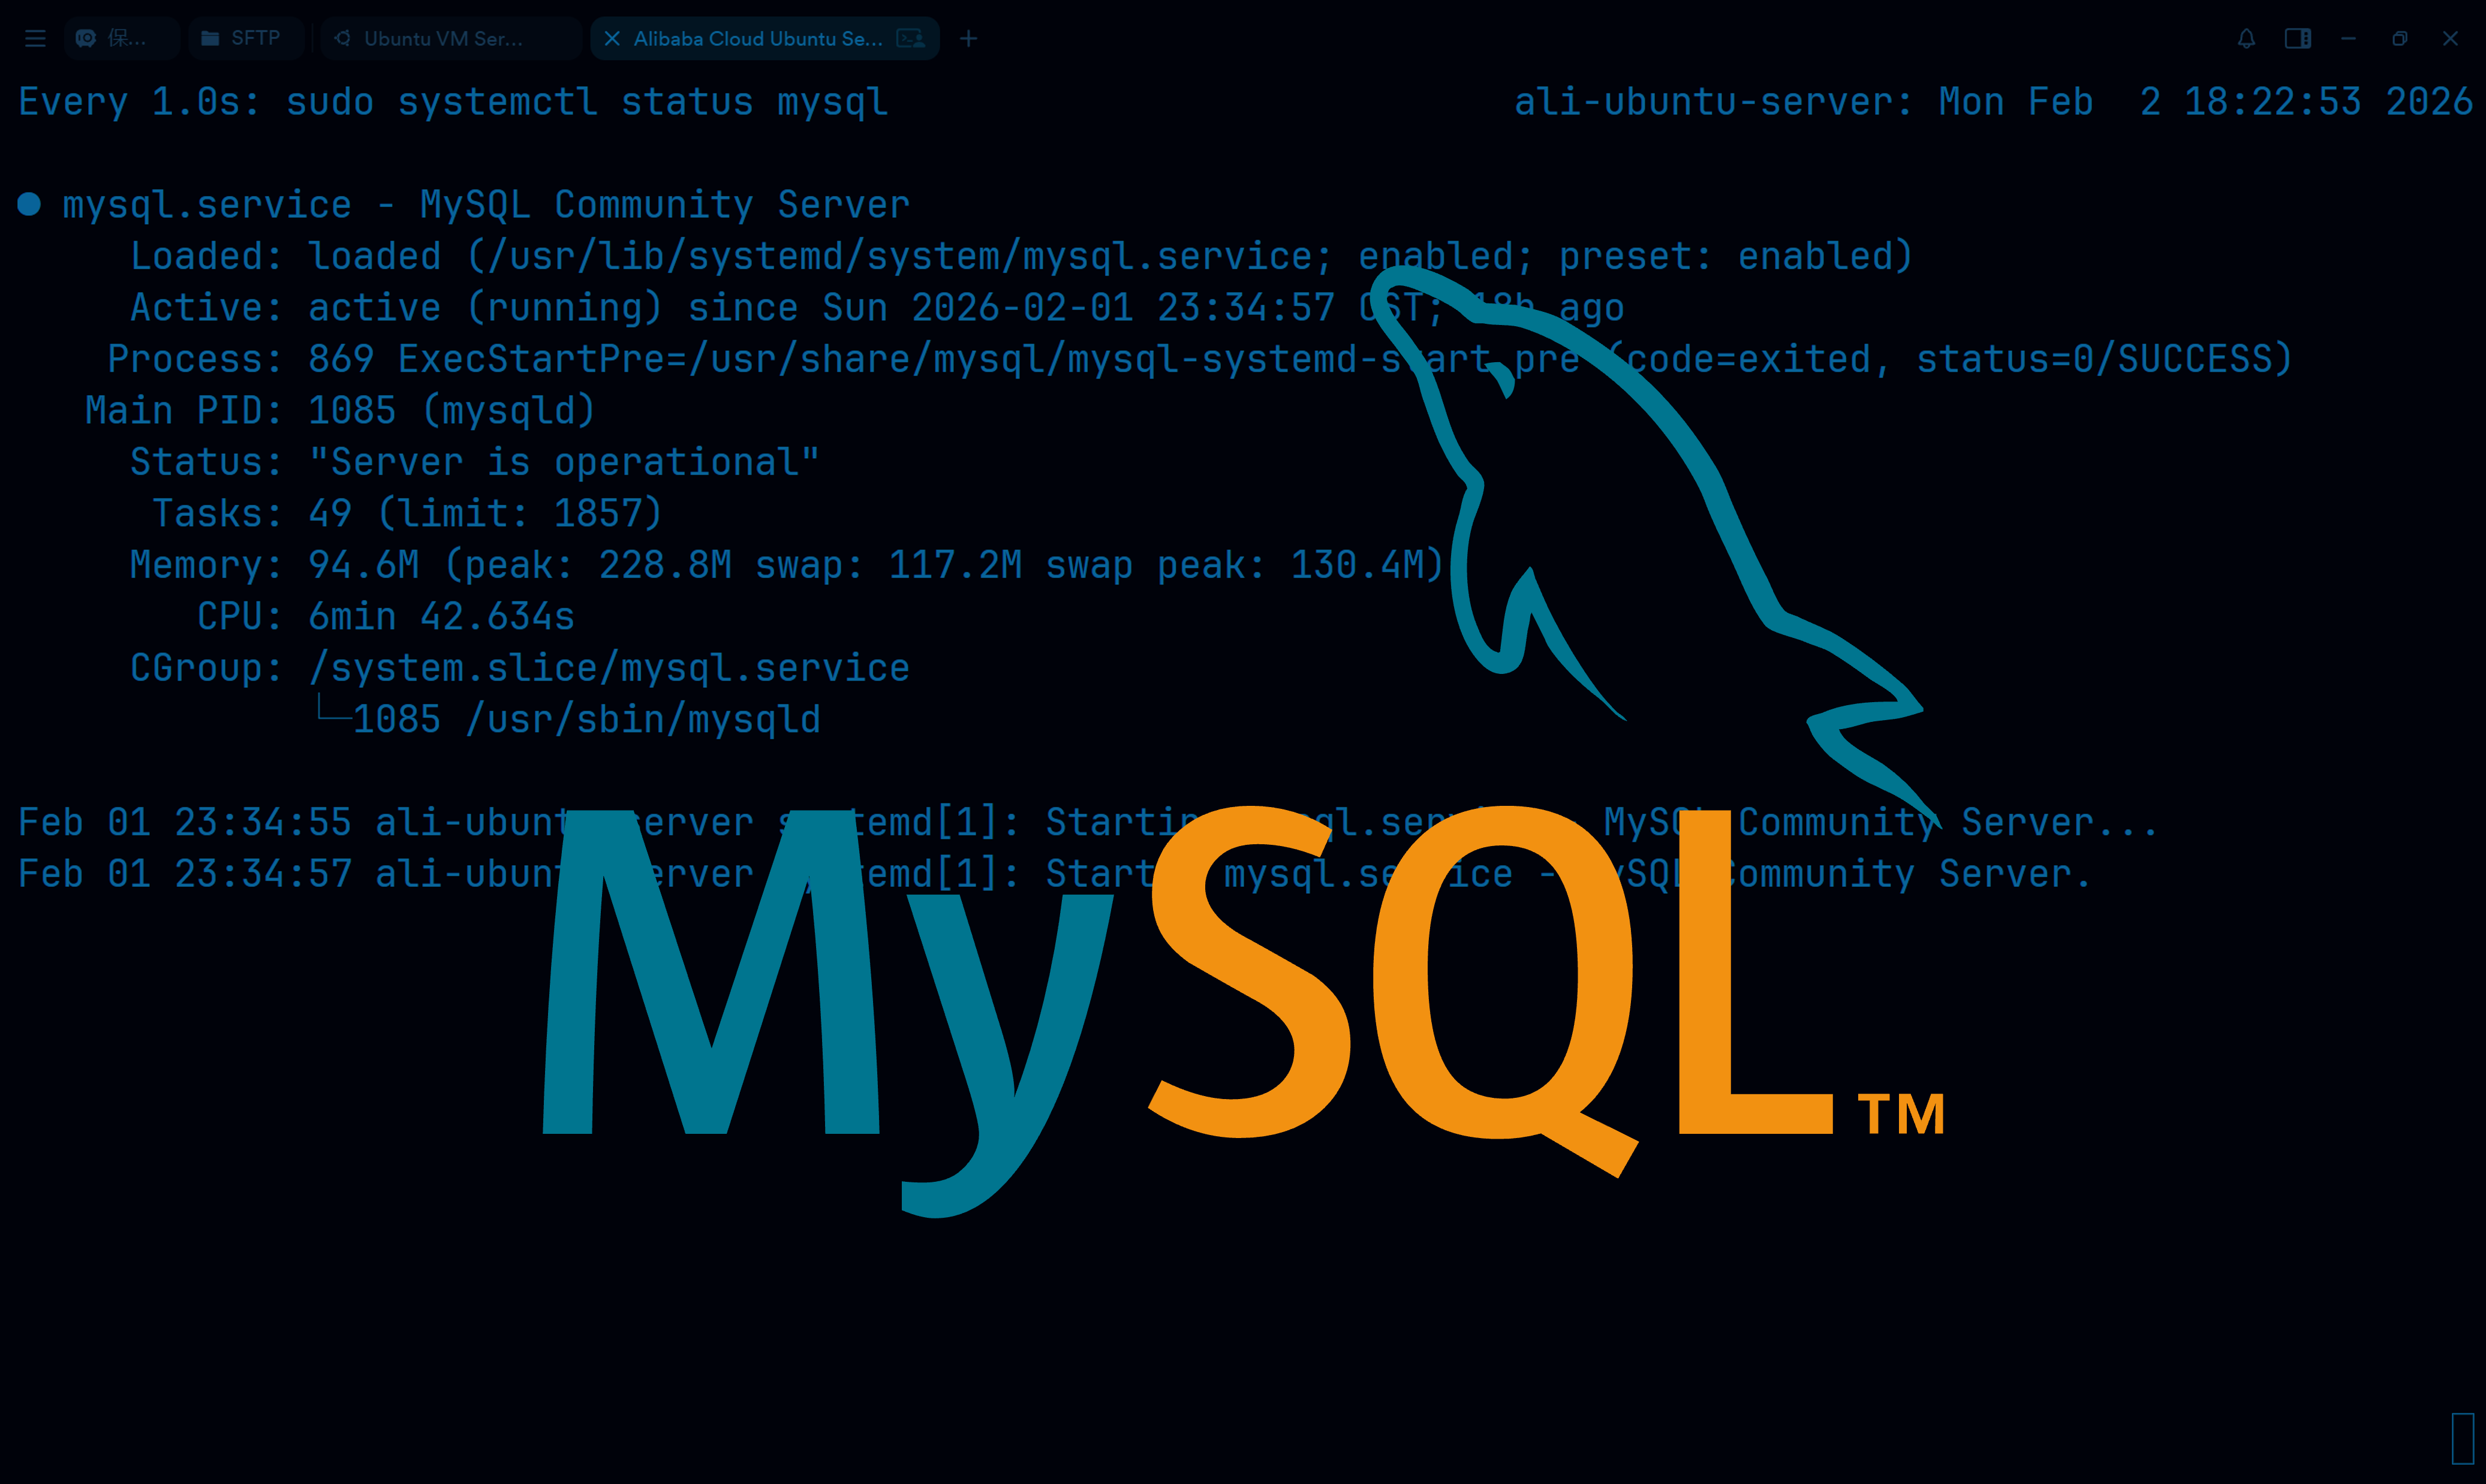
首先先查看一下 MySQL 服务现在需要使用多少内存
sudo systemctl status mysql我查看到的占用是 Memory: 425.6M (peak: 438.9M) ,也就是静默状态下 400Mb 的内存占用
● mysql.service - MySQL Community Server
     Loaded: loaded (/usr/lib/systemd/system/m
ysql.service; enabled; preset: enabled)
     Active: active (running) since Mon 2026-02-02 11:35:22 UTC; 13min ago
    Process: 911 ExecStartPre=/usr/share/mysql/mysql-systemd-start pre (code=exited, status=0/SUCCESS)
   Main PID: 994 (mysqld)
     Status: "Server is operational"
      Tasks: 37 (limit: 9380)
     Memory: 425.6M (peak: 438.9M) # <== 内存占用:425.6M
        CPU: 6.089s
     CGroup: /system.slice/mysql.service
             └─994 /usr/sbin/mysqld
然后 cd 到 /etc/mysql/mysql.conf.d 目录下
cd /etc/mysql/mysql.conf.d备份原配置文件 mysqld.cnf
cp ./mysqld.cnf ./mysqld.cnf.bak && ll如果备份成功当前目录下会存在一个 mysqld.cnf.bak 文件
total 20
drwxr-xr-x 2 root root 4096 Feb  2 11:54 ./
drwxr-xr-x 4 root root 4096 Feb  2 10:31 ../
-rw-r--r-- 1 root root  132 Nov 18 20:53 mysql.cnf
-rw-r--r-- 1 root root 2220 Nov 18 20:53 mysqld.cnf
-rw-r--r-- 1 root root 2220 Feb  2 11:55 mysqld.cnf.bak # <== 备份的配置文件
然后使用 Vim 或者 Nano 编辑器,创建一个 mysqld.cnf.new 配置文件
使用 Vim 编辑器:
sudo vim ./mysqld.cnf.new
使用 Nano 编辑器:
sudo nano ./mysqld.cnf.new
接着将以下的配置文本复制到 mysqld.cnf.new 中
[mysqld]
#
# === 基础安全设置(保留你原有的)===
user            = mysql
bind-address    = 127.0.0.1
mysqlx-bind-address = 127.0.0.1
port            = 3306

#
# === 核心内存优化(针对 2G 内存)===
# 关闭性能模式(省 100MB+ 内存!MySQL 8.0 必关)
performance_schema = off

# InnoDB 缓冲池:Halo 数据量小,128M 足够
innodb_buffer_pool_size = 128M

# 日志文件大小(避免过大)
innodb_log_file_size = 32M

# 最大连接数:个人博客 20~30 足够
max_connections = 25

# 表缓存:降低以省内存
table_open_cache = 64
table_definition_cache = 64

#
# === 连接与缓冲优化(按需分配,不预占)===
# 注意:这些是 per-connection 的,设太高会导致总内存爆炸!
sort_buffer_size = 256K
read_buffer_size = 128K
read_rnd_buffer_size = 256K
join_buffer_size = 128K
thread_stack = 192K

# 线程缓存
thread_cache_size = 4

#
# === 其他优化 ===
# MyISAM 几乎不用,设很小
key_buffer_size = 4M

# 提升写入性能(个人博客可接受)
innodb_flush_log_at_trx_commit = 2

# 跳过 DNS 解析
# skip-name-resolve

# 错误日志(确保有)
log_error = /var/log/mysql/error.log

# 慢查询(可选,调试用)
# slow_query_log = 1
# slow_query_log_file = /var/log/mysql/mysql-slow.log
# long_query_time = 2
将 mysqld.cnf.new 复制并覆盖 mysqld.cnf
cp ./mysqld.cnf.new ./mysqld.cnf然后直接重启 MySQL 服务,让其以新配置运行
sudo systemctl restart mysql接着现在查看一下 MySQL 服务现在需要使用多少内存
sudo systemctl status mysql我查看到的占用是 Memory: 133.2M (peak: 147.7M) ,也就是静默状态下 130Mb 的内存占用,和刚刚优化前相比,少了 300Mb 的内存占用
● mysql.service - MySQL Community Server
     Loaded: loaded (/usr/lib/systemd/system/m
ysql.service; enabled; preset: enabled)
     Active: active (running) since Mon 2026-02-02 12:24:27 UTC; 10s ago
    Process: 1664 ExecStartPre=/usr/share/mysql/mysql-systemd-start pre (code=exited, status=0/SUCCESS)
   Main PID: 1675 (mysqld)
     Status: "Server is operational"
      Tasks: 38 (limit: 9380)
     Memory: 133.2M (peak: 147.7M) # <== 内存占用:133.2M
        CPU: 707ms
     CGroup: /system.slice/mysql.service
             └─1675 /usr/sbin/mysqld
到了这里,你的 MySQL 已经搭建完成了
撒花,撒花。:.゚ヽ(*´∀`)ノ゚.:。